Wiring diagrams
If you are on site and need more wiring diagram examples, use the link below.
Onboarding
If you need more information on how to commission the Auditor, use the link below.
Modbus
(Coming soon) Supported Solar Inverter and Modbus wiring diagrams and information
Other links
6MW-CER Quick start guide copy
6MW-CER Product datasheet
Need more support?
Call us (02) 8316 7540
Mon-Fri 9am-5pm Sydney Australia time
Alternatively, you can send us a support request ticket and we will get back to you within 24 hours.
9 Step installation guide
All Auditor devices can be used for single-phase, two-phase and three-phase sites.
Before installing
1. Make sure you have read the safety manual.
2. Make sure you have a multi-meter with a clamp for testing.
3. Make sure the site has a good 4G signal.
3. Make sure all power to the board you are working on is isolated and turned off.
4. Wattwatchers hardware must be installed by a licensed electrician.
Step 1. Label your CTs
Take out all the CTs and label them on both ends. This is an important step and will help you not only identify each CT, but it will save any future problem-solving if needed.

Step 2. Place the Auditor inside the switchboard.
Place the Auditor into the switchboard making sure the CTs will reach the desired circuits. If they do not reach, you can extend the CT cables up to 10m.
Step 3. Place the label sticker under the circuit breaker
Inside the box is a small sticker with a QR Code and the serial number under it. Place the sticker under the circuit breaker that will be powering the Auditor.
Step 4. Get your voltage connectors ready
Inside the box, you will have a pre-wired single-phase voltage connector and two separate tails (One white, one blue).
Make sure the tails can reach the circuit breaker, if not, you can choose to use your own cable to wire the voltage connector.
a. For single-phase sites
Use the pre-wired single-phase voltage connector and plug it into the top of the Auditor

b. For multi-phase sites
Remove all the tails from the single-phase voltage connector except the neutral and proceed to wire in the multi-phase tails so the connector looks like the picture below (Multi-phase voltage connector)


c. For two-phase sites
If you have a two-phase site, you can wire the connector to suit your required monitoring needs. We recommend you contact Wattwatchers to help with two-phase sites so we can help customise your wiring needs to suit the way you are going to monitor the circuits.
Step 5. Plug in the voltage connector and wire into the breaker
Plug in the Voltage connector and wire your tails into your circuit breaker. The circuit breaker should be no larger than 10A and it is highly preferred if the circuit breaker is dedicated to the Auditor so the customer can power-cycle the device if debugging is ever needed.
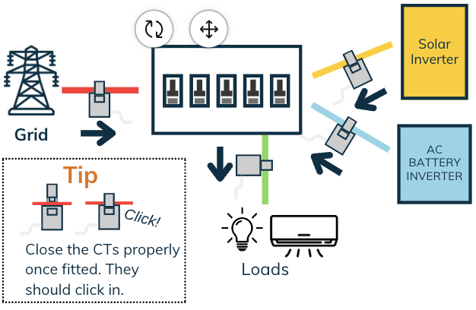
Step 6. Connect your CTs
Connect your CTs to the circuits you are monitoring. Auditor devices that are multi-phase are sensitive to phase positions so you must follow the wiring guides to make sure the CTs are on the correct phase, failure to do so will give incorrect readings.
See here for a full list of wiring diagrams that you can use (6MW-CER wiring diagrams) or see the most common install diagram below
-png.png?width=439&height=439&name=Multi-phase%20voltage%20connector%20(1)-png.png)
Please Note: The Auditor is always wired right to left
Make sure your CTs are facing the correct way!
The direction arrow is clearly printed on each CT. Point the arrow for each CT in the direction as illustrated below.
Step 7. Connect your auxiliary equipment where applicable
For more information regarding Modbus connections > See here (Soon to come)
For more information regarding Contactor connections > See here (Soon to come)
-png.png?width=420&height=420&name=Multi-phase%20voltage%20connector%20(3)-png.png)
Step 8. Turn device on
Once the device has been installed correctly and you are satisfied that the CTs are on the correct phase and the arrows are facing the right way, you can switch the Auditor on when safe to do so. You will need two solid green lights, the ON light (L1) and the cellular connection light (L2). Please wait up to 5 minutes for these to connect.
Quick note regarding communication and signal
-png.png?width=200&height=200&name=Multi-phase%20voltage%20connector%20(4)-png.png)
Only a cellular connection is required for completing the device setup.
Wi-Fi connection can be set up later in Onboarding. If your device does not connect to the cellular network, a compatible external antenna may be required. Contact Installer Support for more information.
Step 8. Commission the device using the Onboarding tool
.png?width=200&height=326&name=onboarding-energydata%20(1).png)
You will need an onboarding account to commission the Auditor. Contact Wattwatchers Installer Support if you need access.
Onboarding is a simple tool that is used to set up the device and check the live data.
To onboard the device go to wattwatchers.app on your smart device or scan the QR code on the front of the Auditor
To learn how to use Onboarding, you can watch our 6 minute video here which includes a comprehensive guide.
Step 9. Get the MyEnergy App (Optional for end users)
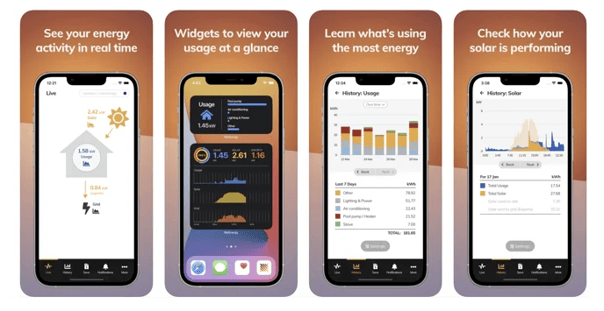
Customers can get the MyEnergy app and add the device within 30 days of installation. To learn more about the MyEnergy app, see the link > https://service.wattwatchers.com.au/mydata.energy-user-guide
-png.png?width=266&height=79&name=pngwing-com%20(4)-png.png)